Saturday, April 23, 2016
Friday, April 22, 2016
EarthDay2016: Happy Earth Day!!!


Here is how we are making our open compost pile:
Materials:
• 7 lengths of 2 x 6 wood, each cut to 3'. Your lumberyard will make the cuts for you. Get exterior, rough, unplanned wood. The wood does not need to be treated with preservatives - untreated lumber will last many years.
• Four lengths of 2 x 2 wood (or 4 x 4 ), each cut to 3' lengths.
• Galvanized common nails, 2 3/4" long. 28 nails.
Putting it together:
• Sharpen one end of each 2 x 2 to act as stakes. This will keep your bin in place.
• Set stakes in place and drive them down into the ground with a sledge or heavy hammer.
• Nail the 3' boards to the 2 x 2's. Leave space between the boards to help aerate the pile. Pre-drilling the nail holes will make nailing easier and prevent the wood from splitting. This is where you can get creative and make your bin taller, or more air space) Make sure you keep the front low, so only nail one board on in the front so that you can easily dump into, scoop out of, and turn your pile as you need.
• Check your stakes, and drive them down to secure everything.
What can you put in a compost pile? (From: http://www.plantea.com/compost-materials.htm )
Paper napkins
Freezer-burned vegetables
Burlap coffee bags
Pet hair
Potash rock
Post-it notes
Freezer-burned fruit
Wood chips
Bee droppings
Lint from behind refrigerator
Hay
Popcorn (unpopped, 'Old Maids,' too)
Freezer-burned fish
Old spices
Pine needles
Leaves
Matches (paper or wood)
Seaweed and kelp
Hops
Chicken manure
Leather dust
Old, dried up and faded herbs
Bird cage cleanings
Paper towels
Brewery wastes
Grass clippings
Hoof and horn meal
Molasses residue
Potato peelings
Unpaid bills
Gin trash (wastes from cotton plants)
Weeds
Rabbit manure
Hair clippings from the barber
Stale bread
Coffee grounds
Wood ashes
Sawdust
Tea bags and grounds
Shredded newspapers
Egg shells
Cow manure
Alfalfa
Winter rye
Grapefruit rinds
Pea vines
Houseplant trimmings
Old pasta
Grape wastes
Garden soil
Powdered/ground phosphate rock
Corncobs (takes a long time to decompose)
Jell-o (gelatin)
Blood meal
Winery wastes
Spanish moss
Limestone
Fish meal
Aquarium plants
Beet wastes
Sunday comics
Harbor mud
Felt waste
Wheat straw
Peat moss
Kleenex tissues
Milk (in small amounts)
Soy milk
Tree bark
Starfish (dead ones!)
Melted ice cream
Flower petals
Pumpkin seeds
Q-tips (cotton swabs: cardboard, not plastic sticks)
Expired flower arrangements
Elmer's glue
BBQ'd fish skin
Citrus wastes
Stale potato chips
Rhubarb stems
Old leather gardening gloves
Tobacco wastes
Bird guano
Hog manure
Dried jellyfish
Wheat bran
Guinea pig cage cleanings
Nut shells
Cattail reeds
Clover
Granite dust
Moldy cheese
Greensand
Straw
Shredded cardboard
Dolomite lime
Cover crops
Quail eggs (OK, I needed a 'Q' word)
Rapeseed meal
Bat guano
Fish scraps
Tea bags (black and herbal)
Apple cores
Electric razor trimmings
Kitchen wastes
Outdated yogurt
Toenail clippings
Shrimp shells
Crab shells
Lobster shells
Pie crust
Leather wallets
Onion skins
Bagasse (sugar cane residue)
Watermelon rinds
Date pits
Goat manure
Olive pits
Peanut shells
Burned oatmeal (sorry, Mom)
Lint from clothes dryer
Bread crusts
Cooked rice
River mud
Tofu (it's only soybeans, man!)
Wine gone bad (what a waste!)
Banana peels
Chocolate cookies
Wooden toothpicks
Moss from last year's hanging baskets
Stale breakfast cereal
Pickles
'Dust bunnies' from under the bed
Pencil shavings
Wool socks
Artichoke leaves
Leather watch bands
Fruit salad
Tossed salad (now THERE's tossing it!)
Brown paper bags
Soggy Cheerios
Theater tickets
Lees from making wine
Burned toast
Feathers
and Animal fur
Horse manure
Vacuum cleaner bag contents
Coconut hull fiber
Old or outdated seeds
Macaroni and cheese
Liquid from canned vegetables
Liquid from canned fruit
Old beer
Wedding bouquets
Greeting card envelopes
Snow
Dead bees and flies
Horse hair
Peanut butter sandwiches
Dirt from soles of shoes, boots
Fish bones
Ivory soap scraps
Spoiled canned fruits and vegetables
Produce trimmings from grocery store
For some other ideas as to what you can do for earth day, check out The International Business Times 2015 Earth Day activities.
Wednesday, April 20, 2016
Bye Bye DTCC
For the past 2 1/2 years I have been in school non-stop. Summer semesters, spring breaks, internships, you name it. I have spent every waking minute of my life at Delaware Technical Community College working on becoming an Entrepreneur, and before that a personal trainer. So with the ammount of time I spent there, I decided that it would be the perfect place to hold classes. Last Jan is when I started my YTT and it was suggested that I start teaching small groups so that I could get the hang of it, so I did. I started a volunteer program at my school where twice a week I would come early and hold a yoga class. Every Tuesday and Thursday for 4 semester now I have holding morning yoga classes from 7:45-8:30.
I am so grateful to those students and faculty who have been there with me a incentives the brining of my yoga journey. Who put up with the terrible akostics of the racket ball courts where we practice. To those who took a chance with me and tried some of my other classes, even if the studios were way out of the way for you. Over this stretch of time I have taken many a photos of you all and your progress, and so I am compiling all of the pictures I still have so that I can share these wonderful memories you all have given me. That I will hold and cherish as I continue this journey.


I am so grateful to those students and faculty who have been there with me a incentives the brining of my yoga journey. Who put up with the terrible akostics of the racket ball courts where we practice. To those who took a chance with me and tried some of my other classes, even if the studios were way out of the way for you. Over this stretch of time I have taken many a photos of you all and your progress, and so I am compiling all of the pictures I still have so that I can share these wonderful memories you all have given me. That I will hold and cherish as I continue this journey.

Lets get Class Started!!!

The Time that Step aerobics left out their steps from the night before and I was really debating weather or not to try to turn our class into step-yoga...

Walking in on Thursdays and seeing this meant today is going to be a good day.
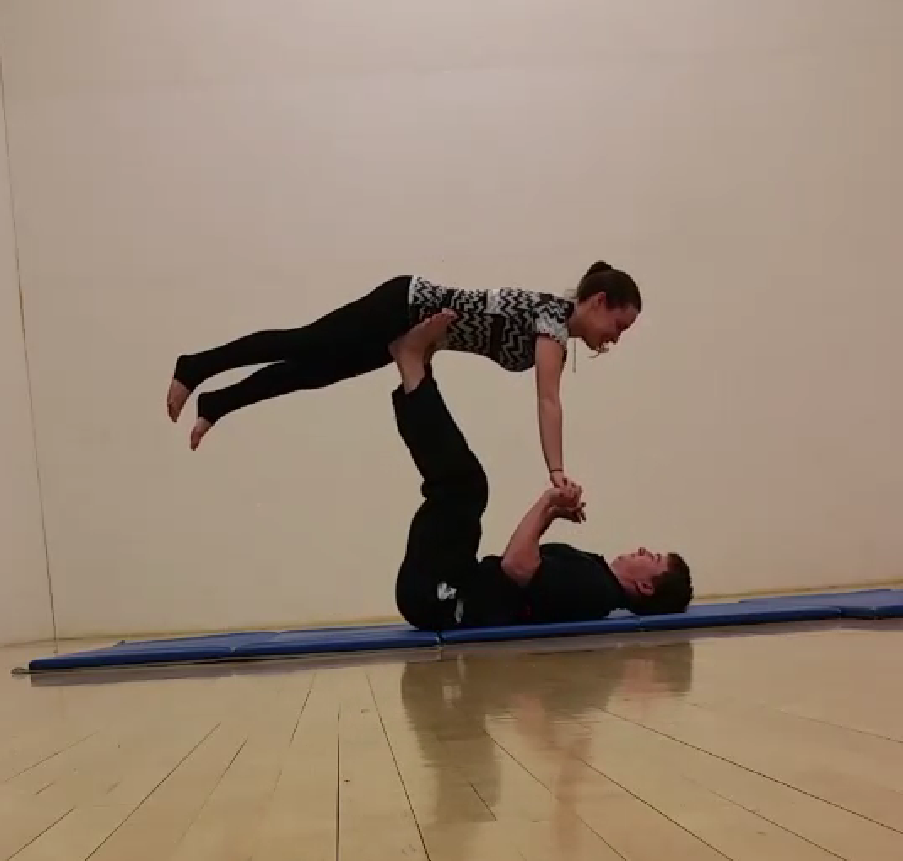
When I set out on a mission to get everyone to try acro... starting with Connor

Spinal Twists are always great!

The times we had a really full classes, with new people...

And the times we had not so many.

Im serious Spinal twists are the best!

Savasana is my fave!!!

Drews first time doing Acro!!!

Hamstring Strength Building

This years Power Yoga Flyer

This years Restorative Yoga Flyer

The time we turned class into Meditation time

Tim and I used to practice Acro Yoga a lot!

Core Work

That time everyone got really mad at Utkatasana

The time I got hot computer guy aka Peter parker aka his real name is Craig guys... to do some acro with me!!!
I am finally graduating and these classes will unfortunately be coming to an end as of Thursday, April 21. I will miss you all!
Tuesday, April 19, 2016
Monday, April 11, 2016
Thoughts for 4/11/16
Wow, we are almost ½ way through April. I seriously feel as
though I have done nothing this entire month. The only things I can honestly
remember doing this month are being really tired and thus taking a lot of naps.
This bums me out though. It makes me feel like I am not doing my job right or
that I am not cut out for what I do, so I decided to take a more serious look
at what I have accomplished this month so that I can get a better idea as to
how productive I have been so far.
1 Prepared and finalized 2016 first Quarter taxes
2 Finished my business plan or when I up and move everything
to Media
3 Finished every project, assignment, and homework for every
class up till graduation day (so all I have left is exams)
4 Programmed two 4 week workshops, and 1 workshop by myself,
and I have one more in the works
5 Programmed an additional 2 workshops with friends, and
have 2 more in the works
6 Branched my company out to a new product line and am now
offering retail
7 Started my summer deals for personal training
8 I didn’t die
I always add the didn’t die, because with my anxiety, no
matter how much I shut down those fears and know that my stress isn’t going to
kill me, I’m always happy to say that I didn’t die as an accomplishment. I was hoping to come up with a list of
10 accomplishments, and if I add the house parties, and mommy duties to that
list I would have 10.
As someone who constantly looks at the situation with “what
is the worst outcome possible” it is nice to look back sometimes and see that
the worst did not happen, and that everything is still ok.
Saturday, April 9, 2016
Forever Easter Eggs
Personally I like to keep mementos of holiday crafts from
one year to the next and Easter eggs are the same. For years I have spent teaching my friends about
how to create ester eggs that wont spoil or go bad and that you can essentially
keep forever, and now I would like to pass this on to everyone else I
know.
Things you will need:
-Something sharp (if you have a needle this is ideal) if you
so not a small and sharp knife will do the trick.
- raw eggs (because I do these every year, I try to only
make 2-3 that will last forever otherwise my house would become over run with
eggs, but remember they are super fragile so if you are clumsy, make a few more)
Optional: markers, paints, dye, stickers, rubber bands,
crayons,

Step 1: Holding the egg as it comes in the crate, create 1 large hole at one end of the egg and a slightly smaller hole at the other end
 Step 2: Blow into the smaller hole pushing the yoke and
white out of the larger hole (if this becomes difficult, try enlarging the
bigger hole, or sticking the needle in further to break up the yoke) and into a
bowl.
Step 2: Blow into the smaller hole pushing the yoke and
white out of the larger hole (if this becomes difficult, try enlarging the
bigger hole, or sticking the needle in further to break up the yoke) and into a
bowl.
Step 3: Rinse your eggs under some water or try blowing water through them as well. Then let them dry.
Step 4: Paint!!! We use all the same techniques as we do
with other eggs, like rubber bands, stickers, crayons, dye, markers, and
paints. Be creative with these guys, they will last you a lifetime.

Here are some eggs we used crayons to write a message on or
draw lines


Here are some we markered on.
Tuesday, April 5, 2016
Subscribe to:
Posts (Atom)